You may want to think about building your own welding table if you’re looking for a simple welding job. A welding table should be able to soak up the heat and not ignite or warp while you are working. Welding tables must be built of steel and constructed to stay stable even while holding a heavy load. Creating and developing your own welding table will allow you to design a piece that will fit your work area perfectly and is cheaper than acquiring a pre-built design.
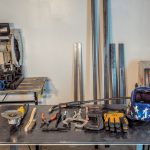
The basic tools required to build a welding table aren’t anything special and you most likely have the majority of the tools lying around your store already. You will require to have the pieces of metal that you are going to use for the leading cut or you can cut it yourself utilizing either an oxyacetylene torch or a plasma cutter. When you have the dimensions of your welding table worked out you are going to also require a band saw, grinder, hammer, square, level, and naturally your welding maker.
How much area you require to work around the welding table, and the type of welding work that you will be utilizing it for; figuring all of this out prior to you begin will make the whole structure procedure much easier. The crucial thing to keep in mind when building a welding table is that all of the metal being utilized is of the same type to guarantee that the welding table is consistent and strong.
After you have determined the size of your welding table, your next action will be to cut the top. You must lay out the cuts on the metal plate and permit 1/8 inch on the length and width cuts to permit finish grinding. Prior to you make any cuts you need to eliminate any and all combustible products from the work area. Elevate the piece of metal you are cutting for the top and cut utilizing either an oxy-acetylene torch or plasma cutter. After the cuts have actually been made, you will require to get rid of any slag using a hammer. To do this you can strike the cut ends of the tabletop utilizing any slag and the hammer present will easily break off. As soon as all of the slags have actually been eliminated you will require to grind the edges to smooth any rough locations on the cut edges.
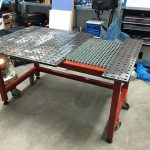
The next step is to figure out the number of support legs your welding table will need. This can be figured out by the density of the tabletop and the total size of the table. If you utilized a 3/8-inch tabletop, the distance between the support legs needs to not be higher than six feet. During this step, you will also need to determine a comfy working height of the welding table. Keep in mind that the cut length of the legs will be the ended up height minus the thickness of the tabletop. Now, you will need to cut the appropriate variety of legs required and make certain that both ends of the legs are square. Layout the place of the legs on the tabletop, and after you have put all of the legs in their correct areas, you can now start to weld them onto the tabletop.
You may find that you need some support pieces that link the legs at some time below the table and which will serve as braces to keep the legs straight. These pieces of metal can be bonded to each of the table legs for added strength and support. You might add a rack under the table, which then acts as the bracing for the table legs and shelving all in one. A shelf bonded under the table can offer you much-needed storage space to keep your welding tools and devices close while you are working.
There is no limit to the number of devices you can include in your welding table. Some of these accessory products you may want to consider adding to your welding table are pieces of metal that can be utilized to ground your welding device to the table. Putting numerous pieces of metal along your worktable will likewise permit you to move your welding machine around your work table and still be able to correctly ground it. There may be some threats with using your welding table as the ground while welding your workpieces on top of the table. This online forum thread, “Grounding the welding table.”, on WeldingWeb.com is an excellent resource when considering this option.